My Day Out at Sea

I’ve wanted to go clamming and crabbing for as long as I can remember. I asked my dad to take me every summer and for one reason or another, we never got the chance to go. So I feel pretty damn lucky to be living with a guy who was totally down to go.

We were sitting on the couch staring at each other yesterday morning throwing around ideas for things to do and the option of clamming was thrown on the table. The only thing with clamming, though, is that you have to go during low tide or else you’ll have a terrible time trying to rake and dig in the mud. Luckily for us, low tide was at noon. So we hopped in the car, went to Benny’s to get ourselves a clamming rake and, along with John’s best friend Steve, headed to Oakland Beach for the day.

Our digging field at Oakland Beach

Our digging field at Oakland Beach

I’m glad it was slightly overcast, because there was  no way I would have enjoyed it anywhere near as much as I did if the sun was shining on us all day.

I won’t lie, though. It took us a looong time to get into a groove. Because we’ve never dug for clams before, we weren’t sure what spots were the best or what the tell-tale signs of clams are. (Come to find out, after extensive YouTube research, John found out that holes in the sand, bubbles rising from the sand or squirts of water = jackpot). We also brought along the crabbing cage that my brother gave me for my birthday baited with a raw chicken leg; but the only thing we caught was a crab the size of a dime. Clearly not big enough to take home….

We made sure to keep our catch within the Rhode Island shellfishing regulations; and even with that, we ended up with a nice handful.  Though we didn’t end up getting as much as we would have liked to, I feel pretty accomplished…and I must say, they tasted pretty damn good fresh off the grill too. 🙂

Not bad for our first time out.

Not bad for our first time out.

I’ve always been a marine nerd, so digging for clams was definitely my kind of beach day. I’m a happy girl.

Homemade Sopressata (Italian Salami)

Before I moved to Rhode Island, I was only familiar with a couple of different Italian salamis: pepperoni, Genoa and one that my grandfather called “hard, smoked salami.” To this day I don’t think he’s revealed its actual name. When I moved, however, I was introduced to capicola and sopressata. Because I have a TERRIBLE time pronouncing them correctly, I joke and call them cap-a-ho and souporsalad. But I digress.

John and I have been talking for a long time about learning to make our own sausages and salamis; so last week, I looked up a recipe for homemade sopressata…and today we tried it out.

We ground 7 pounds of pork and started the curing process by adding the following spices:

  • 1 tbsp. ground black pepper
  • 2 tsp. ground white pepper
  • 1 tbsp. non-iodized salt, finely ground
  • 1 tsp. ground coriander
  • 1 tbsp. minced garlic
  • 1 cup of grappa vinegar

The rest can be summed up by this brief video. (Yes, I’m in my comfy clothes…don’t judge me).

We have to let the salamis hang in a cool, well-ventilated room for 1-2 weeks and then in a warm, well-ventilated room for 2-3 months. It was certainly a messy experience; but well worth it, I think!

Paella – My Version!

So John and I have become couponers because we practically live at the grocery store. That being said, we were able to hit some pretty nice deals on seafood this week; and because I still had my homemade chorizo still sitting in the fridge that I had made the day before, I decided to take a big risk and attempt paella.

Now, for those of you who are not familiar, paella is a Spanish rice dish that is often adorned with chicken, seafood and peas – but I ABSOLUTELY HATE peas, so I opted to leave them out. (No really. I won’t even touch a dish that has peas in it…even if they’ve been removed for my sake. I’ll know they were there).

John and I are pretty big fans of Tyler Florence, so we chose to use his recipe as the main guideline for this and made a few changes along the way to better serve our needs with the ingredients that we had. Our recipe called for:

  • 4 cups of short grain rice
  • 6 cups of water (we chose to use chicken stock for added flavor)
  • 2 large chicken thighs cut in half – skin on
  • 1 pound chorizo
  • 1 pound cherry stone clams
  • 1 pound large peeled and cleaned shrimp
  • 1 pound rock crab claws
  •  1 tablespoon dried cilantro (most of the time it will call for parsley)
  • 1/4 cup olive oil
  • 1 can crushed tomatoes
  • 1 Spanish onion, diced
  • 5 cloves of garlic, crushed (I left them as large chunks because we love garlic, here)
  • 1 teaspoon turmeric (because the price of Saffron is just outrageous)
  • 1 lime cut into wedges
  • 1 teaspoon paprika (to season the chicken)
  • 2 teaspoons dried oregano (to season the chicken)
  • salt & pepper to taste

Now, this is quite an expensive dish to make and if John and I hadn’t hit the sales that we did, I probably wouldn’t have tried it.

Step 1:

In a paella pan or large shallow skillet (we used the latter, as we don’t have a paella pan…yet) add the 1/4 cup olive oil and saute the chorizo over medium-high heat. Once cooked through, remove and set aside.

Hot and delicious!

Cooked Chorizo

Step 2:

In the same skillet, brown the chicken – skin side down first. Once you have a nice crust on both sides, remove and set aside.

See the nice golden crust?

See the nice golden crust?

Step 3:

Again, in the same skillet saute your onions, garlic and cilantro (or parsley, if that’s what you prefer) until they are nice and tender. Then add the tomatoes.

Delicious paella juice, as I call it.

Delicious paella juice, as I call it.

Step 4:

Fold in the rice so each grain is coated in the juice and pour in your 6 cups of warm water or stock – let simmer.

Every now and then, make sure you GENTLY stir the rice mixture so nothing ends up sticking to the bottom. Later on you might notice some sticking, which is fine – that part is quite yummy – but you don’t want any stickage right now.

Step 5:

Once the rice has soaked up the liquid and has swelled and become somewhat fluffy, add the chicken back into the pan. I tried burying my chicken pieces a little bit, so they had a better chance of cooking through. This is also a good time to add your chorizo back to the pan as well.

Step 6:

Add your seafood to the pan. Shrimp will usually take between 7-10 minutes to cook through. Clams even less but because we didn’t have a proper paella pan, our skillet was a bit over-crowded, causing the cooking time to extend. We actually had to pull the seafood out and steam in a separate pan so they would all cook through. The crab claws we pre-cooked, so we were essentially just warming them through and letting them take on the flavor of the paella juice.

**NOTE: At this point you do not want to stir your paella – this will cause the rice and fish to not cook properly. Let it sit. This is when you’ll start to notice some rice creating nice, yummy crispy bits at the bottom of your pan.**

Step 7:

Once everything is cooked through, remove from the heat and let sit for a few minutes. Garnish with lemon or lime wedges (we also used a handful of chopped green onion).

Step 8:

Eat!

Ta Da!

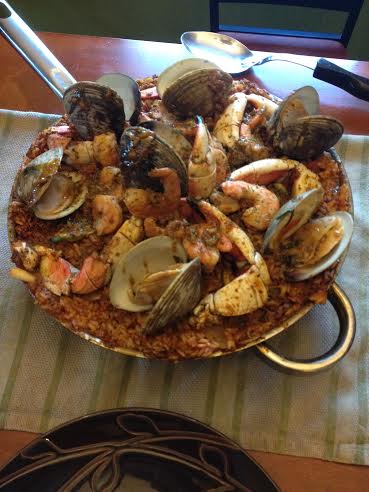
Ta Da! This was so big it needed an aerial shot.


Now, if I had thought this through instead of just jumping right in, I would’ve cut this recipe in half – maybe even more than that – because when all was said and done, we had enough food for about eight people.

We’ll have leftovers for days!!

Thanks for reading, stay tuned for my next delicious recipe!

Homemade Mexican Chorizo

If you could have experienced the smells coming from my kitchen, you’d die.

I’ve decided that I want to embark on the homemade sausages adventure. We spend so much money each week on pre-made sausages that it’s almost a sin – and I find that my stores tend to carry packaged meats in a variety of cuts for a cheaper price. In the spirit of Cinco de Mayo, I decided to take a stab at homemade chorizo first.

(I’m also a fan of Portuguese chorico – which is smoked and not as spicy…I might make that in the near future as well).

Of course, I had no idea what I would even need; so I consulted my good friend Google and stumbled upon the blog “La Cocina de Leslie” in which I found a nice recipe for Mexican chorizo that didn’t seem too intimidating.

It called for:

  • 2 dried guajillo chilies ( we ended up using Pazilla chiles, since we couldn’t find guajillos in our local market)
  • 2 dried ancho chilies
  • 2 to 4 tablespoons apple cider vinegar
  • 1/4 medium onion
  • 4 cloves garlic
  • 1 pound ground pork (with at least 20% fat)
  • 1/4 teaspoon ground cinnamon
  • 1/2 teaspoon ground cumin
  • !/2 teaspoon paprika
  • 1/2 teaspoon dried oregano
  • 1/2 teaspoon chili powder
  • 1 teaspoon salt

John and I are the spice family. We have a copious amount of spices in our kitchen from our various adventures over the past year. The only thing we needed to make a trip out to the store for, were the chiles and ground pork. I tried to follow her recipe as closely as possible despite having different chiles.

Step 1:

Toast the chiles in a dry skillet for 10 seconds on each side. Once toasted, add enough water to cover the chiles. Bring the water to a boil, then shut off the heat. Allow the chiles to soak in the water for twenty minutes. This re-hydrates them and gets them nice and tender.

Here you can see the chiles have softened from the liquid.

Here you can see the chiles have softened from the liquid.

Step 2:

In a blender combine the chiles, onion, garlic and 2 tablespoons of the cider vinegar. (You should have seen me at this point. I was practically bawling my eyes out thanks to good ol’ Mr. Onion…) You want the mixture to come out resembling the texture of ketchup. While Leslie says to add more vinegar or water to the mixture to help it reach this consistency, I chose to use the liquid that the chiles sat in. This gave the mixture deeper flavor.

See? Ketchup!

See? Ketchup!

Step 3:

Add the chile mixture and all of your spices to the pork at this point and mix well.

**NOTE: If you are combining by hand, make sure you only use one hand. Using both will alter the temperature of the meat and could cause it to spoil on you**

If it weren't for the fact this could make you sick, I'd eat it like this!

If it weren’t for the fact this could make you sick, I’d eat it like this!

Step 4:

Let the mixture sit overnight in the refrigerator. This allows all of the flavors to marry.

Step 5:

When ready to serve, saute in a greased pan and enjoy!

Hot and delicious!

Hot and delicious!

Wait until you see what I decided to use mine in ;). Stay tuned!


My Chiles Rellenos

I swear, I come up with some real good ideas sometimes.

John and I were at the supermarket just the other day and I saw that poblano peppers were on sale. Now, I had never had them before, but I love peppers AND I happen to follow Kraft recipes on Pinterest so – enter that *bing* noise you hear in your head when you come up with something brilliant – I thought I’d try my own version of chiles rellenos.

Prepped for the Oven

Prepped for the Oven

The Kraft recipe calls for:

  • 4 large  poblano chiles (we ended up going with 3 – the store’s peppers weren’t very impressive)
  • 1 cup  TACO BELL® Thick & Chunky Salsa
  • 1/4 cup  chopped fresh cilantro
  • 1/2 tsp.  ground cumin
  • 1-1/2 cups  chopped cooked chicken
  • 1 cup  cooked long-grain white rice
  • 1-1/4 cups  KRAFT Mexican Style Finely Shredded Four Cheese, divided
Now, I followed the process of this recipe almost verbatim, but decided to stray from their version of salsa and make my own. Actually, I made something very similar to the sauce I used in my huevos rancheros. I used:
  • canola oil
  • 1 medium white onion
  • 1 12-oz can crushed tomatoes
  • 2 chipotle peppers in adobo
  • 2 tsp. adobo sauce
  • 1 tsp. chili powder
  • 1/2 tsp. cumin
  • 1 tsp. fresh garlic
  • 1 tsp. dried oregano
  • 1 tsp. paprika
  • 1/4 cup fresh cilantro

Cook the onions in the oil over medium heat until they’re translucent. Then add in (one at a time, of course) the tomatoes, peppers adobo sauce and the spices. I promise you that once you try this, you may never want to buy the jarred stuff again. There’s nothing better than that fresh taste….unless you’re into processed sugars; then stick with the jarred stuff.

The Steps:

To roast the peppers, place on gas stove burner over medium flame. This will get the skins nice and charred, making them easy to peel off. To make the process even easier (yes, it can happen) hold under running water, then peel away blackened skins.

Cut lengthwise slit in each chile, but don’t cut through both sides. Remove the seeds.

Take your salsa mixture and spread half onto bottom of your baking dish that has been pre-sprayed with cooking spray. Mix the chicken, rice and half of the cheese into the remaining sauce and mix until all combined. Stuff the peppers with this mixture.

In a 350 degree oven, bake your peppers for 30 minutes, and enjoy!

complete with roasted corn.

complete with roasted corn.

Oh yeah, I’m a genius ;).


Traditional Tiramisu

You know, I never realized how spoiled I am.

The weather was gorgeous earlier in the week, so John and I decided to take advantage of it by traveling to Federal Hill in Providence to explore the Italian Markets. I’ve been stressing with finals so he thought it would be a nice break to go walk around and see what the markets had to offer. Of course, I welcomed the break :).

Federal Hill Center.

Federal Hill Center.

Now, I realize that I’m very late to the party; but I recently discovered a splendid YouTube channel called “Laura in the Kitchen” hosted by Laura Vitale. We’ve been watching at least ten episodes a day. She makes traditional and modified versions of classic dishes from Italy, France and the U.S. I’m not a promoter or anything, but you should check her out if you’re feeling like trying something new. (Her cupcakes looks AWESOME! Anyway…)

On her site, I found a recipe for tiramisu – which I love; so I decided to give it a try. Luckily for me, I was in the perfect area to get the ingredients. John and I explored all the shops, but did our shopping at Tony’s Colonial. There we bought:

Not for Tiramisu, but still delicious

Anchovies! Not for Tiramisu, but still delicious

and

Ladyfingers. You want the hard ones for this recipe, not the soft.

Ladyfingers. You want the hard ones for this recipe, not the soft.

We also bought Marscapone cheese, heavy cream and unsweetened cocoa powder. John and his family are espresso drinkers, so I didn’t need to buy that, but it’s necessary to soak the ladyfingers. Speaking of espresso…..we also stopped for cappuccino!!

mmmmmmm

mmmmmmm

On to business. Here’s what you’ll need for tiramisu:

All the ingredients

All the ingredients

  • Ladyfingers
  • 1 1/2 cups cooled espresso
  • 1 16oz tub of marscapone
  • 1 tsp vanilla extract
  • 1 1/2 cups whipping cream
  • 2 tablespoons cocoa powder
  • 1/3 cup granulated sugar
  • She used rum in her recipe, but we didn’t have any on hand so we omitted it

Step 1: Whip the heavy cream in a large bowl and let chill in the fridge.

Step 2: In another large bowl, cream together the mascarpone, vanilla and sugar. Once combined,  fold the whipped cream into mascarpone mixture one half at a time.

Step 3: Add espresso (and rum if you’re using it) to a good-sized bowl and set aside. Also have a 9 x 9 baking pan and your ladyfingers and cocoa ready.

Step 4: Dip each ladyfinger into the coffee mixture and lay in the bottom of your pan until the bottom is covered.

Step 5: Pour half of the mascarpone and cream mixture over the first layer of the espresso soaked ladyfingers and spread it evenly. Sift 1 tablespoon of cocoa powder over the cream once it’s spread.

Step 6: Lay one more layer of soaked ladyfingers and repeat step 5 – using the last of the marscapone mixture and cocoa.

Unfortunately, you can’t dig right in. You have to let this chill for at least 3-4 hours before serving.

Yeeeah buddy

Yeeeah buddy

There you have it! Laura Vitale’s Tiramisu. I’m thinking next time, I’m going to try to use strong coffee instead of espresso, as I found the taste to be too strong – though everyone else seemed to disagree ;). Stop by and check Laura’s site and YouTube channel out and TRY THIS RECIPE!!!

My First Easter Dinner

For all of my 25-years on this earth, my grandfather has been the man in charge of making Easter dinner. We would have lamb, ham, chicken, mashed potatoes, shrimp cocktail, stuffed mushrooms and a couple of different vegetables – depending on his mood. The man cut no corners.

However, a few weeks ago, the ice got the better of him and he ended up falling on his front walk. Though he got a clean bill of health from the doctor’s office (thank God), he is in no mood to be cooking an entire 4-course meal. That’s where John, my sister and I come in. Because he’s been feeding us Easter dinner for our whole lives (with the exception of John, he’s only been in my life for two years now) we decided it was our turn to return the favor and cook dinner for him.

We decided to keep the menu as traditional as possible. John and I are in charge of:

  • Spinach and garlic stuffed roasted lamb leg
  • Brown sugar and cola glazed ham
  • Scalloped potatoes
  • Succotash with bacon and garlic croutons

and for dessert:

  • Butter yellow cake in the shape of an Easter egg
  • Coconut cream pie (Pop’s favorite)

My sister’s in charge of:

  • Rosemary and lemon roasted chicken
  • Deviled eggs
  • Sauteed green beans

Because my sister is on a very limited diet due to a medical condition, she’s cooking more or less for herself. She didn’t want to inconvenience anyone; but she planned on making enough for everyone, just in case.

I know that normally, I provide pictures of the “while cooking” phase; but that would mean a copious amount of pictures (did you not see our menu?) so I’m just going to provide you with the finished product images this time. I hope you can forgive me. This was a great accomplishment for me. See, John used to own a catering company, so he’s used to this kind of cooking. I, on the other hand, have never attempted an entire holiday meal. So he let me take charge while he sat in the background and fed me instructions. Here are my food trophies:

mmm Lamb

mmm Lamb

Scalloped Potatoes

Scalloped Potatoes

Coconut Cream Pie

Coconut Cream Pie


Happy Easter, everyone. XOXO

Four Generations of Minestra

So, the dreaded winter cold visited our house last week and all of us fell victim.

In an effort to make us all feel better, I decided to learn my father’s recipe for Minestra (Min-est) – a feel-good soup of ham-based meats and greens. It was the best idea I ever had. It’s quite an expensive soup to make. My dad’s version requires pepperoni (2 smaller sticks or 1 large), hot Italian turkey sausage (1 package), smoked ham-hock, a daisy ham, escarole (3 heads), cabbage (1 head), salt and pepper.

There's not much to it!

There’s not much to it!

My dad would always make it around Superbowl time. It’s the perfect winter soup; and since there aren’t any additional flavors aside from the meat and greens, it pleases pretty much everyone. I’m not a ham eater – although I am a pepperoni fan – but the broth and greens are the best comfort food I can think of. The thing about this soup is that it’s also time-consuming. I’ll share the recipe with you, but you need to promise that when you make this for you and your family, you keep in mind that this particular recipe has been handed down four generations. I’m the fifth; and I will be teaching it to my kids…if I decide to have them. If you don’t like the finished product, I can only apologize and say that you’re missing out; this soup is by far one of my favorites. But, I’m sure there are ways you can play around with it and make it your own as well.

Step One – The Prep:

Take the pepperoni and sausage and cut into 1/4-inch slices. (This is just my rough estimate. You can go as thick or thin as you please. Just remember it’s going to be cooking for a few hours so don’t make it too thick or thin as it may not cook properly.)

Cut the daisy ham into chunks. The ham-hocks you can leave whole. My dad usually uses one large (and I mean LARGE) one. I was unable to find sizable ham-hocks at my store, so I settled for a package of four small ones. They are what really flavor the broth.

As for the greens, cut them down into larger-scale bite-sized chunks. Because these will wilt down, you don’t want to cut them too small. I just gave the greens a good ol’ rustic chop with my knife and called it a day. Once they’re cut, soak them in cold water to clean them. They will stay in the water bath until you’re ready for them.

Step Two – Making the Stock and Cooking the Meat

These two steps are done at the same time, which is quite convenient.

Add all of the meats – the sliced sausage and pepperoni, the daisy ham chunks and the ham-hocks to the stock pot. Cover the meats with water. MAKE SURE YOU PUT ENOUGH WATER THAT THE MEAT IS COMPLETELY SUBMERGED AND THERE IS ABOUT AN INCH TO TWO INCHES OF WATER ABOVE THE MEAT. This is important. Some water will evaporate and you don’t want anything to dry out.

Boil the snots out of the meat until the ham-hocks are are tender and start to fall apart. By this point, you will want to take the ham-hocks from the pot and remove the bones and fat. Once cleaned, the meat can go back into the pot and rejoin his friends.

This step usually takes just over an hour.

Step Three – Add the Greens

Once the meat is all cooked and the bones and fat are removed, it’s time to add the greens; which have been soaking in their water bath. Drain the greens as well as you can and start adding them to the pot. Once all the greens are in, add a palm-full of salt and a generous sprinkle of black pepper. Yes, the meats are quite salty, but you also want to season the greens. Nothing worse than greens that have no taste…

Cover the pot and let boil until the greens are wilted and cooked through. You want them soft but not falling apart. When I made this, it took about two hours for all of the greens to cook through.

That’s it! The entire process takes anywhere from three to four hours but it is so worth it! The broth takes on a nice smoky flavor from all of the ham and the pepperoni and black pepper give it a nice kick – without making it super spicy. This is the kind of soup that you can feel warm your whole body.

So. Good.

So. Good.

This recipe will leave you with enough soup for four adults and plenty of leftovers (assuming you don’t all eat it at once).

Please, enjoy.

Homemade Sushi: Attempt One

John and I love sushi. We go out for it at least once a week. For any of you that enjoy it, you know how big of an expense that can be. One day, he and I decided to take a stab at making our own, in an attempt to save some money.

Believe it or not, we were able to get all of our cooking ingredients from our local market. (We went to Whole Foods – not a chain grocery store like Stop & Shop. It was slightly more expensive but not by much…we knew we would get exactly what we were looking for there).

We bought:

  • Sushi-grade Salmon
  • Sushi-grade Tuna
  • Imitation crab sticks
  • Avocado
  • Cucumber
  • Sushi rice
  • Nori Seaweed
  • Tobiko (small fish eggs for added texture)
  • Pickled Ginger
Our fish of choice

Our fish of choice

John has had experience rolling sushi, as he owns an as-needed catering company – aside from his entertainment business. (He’s only really busy catering around the Holidays). But this was my first attempt at the process. Actually, it’s more like a procedure. Everything has to be precise or else the roll will fall apart on you.

Of course, the first step in the process was cooking the sushi rice. Sushi rice is slightly different in that cooks differently so it can maintain that sticky texture. You can try using other rice, but it won’t hold together as well. Once the rice was cooked and cooled, we began assembling our rolls.

**Disclaimer: if you want to try rolling your own sushi, make sure you dampen your hands with a little water or sesame oil. If you don’t, you’ll have a nice new pair of rice gloves for the winter :). It’s sticky stuff!**

Sushi rice and Nori

Sushi rice and Nori
Keep a little space of seaweed uncovered so you have something to adhere the other end to.

You can buy sushi rolling kits almost anywhere. My aunt got me and my sister one for Christmas last year. It comes with  a bamboo mat that is used for rolling and forming the sushi. Unfortunately, I’m not the one who has it; so we used plastic wrap instead.It didn’t come out as bad as I thought, but the mat definitely would have been easier.

Note to self: steal kit from sister…..

formedroll

Formed inside-out roll!

I had a hard time assembling the inside-out rolls – the ones where the rice is on the outside. Everything kept falling apart; so I left John in charge of those. I will say, though, that I made a mean looking roll when the seaweed was on the outside!

My handmade Spicy Salmon roll with Spicy Mayo

My handmade Spicy Salmon roll topped with Spicy Mayo

To make some of our rolls spicy, John put together a spicy mayo concoction, which is:

  • Mayonnaise
  • Sriracha
  • Vinegar
  • green onions
  • and a dash of soy sauce

We made a total of five different rolls. It was a time consuming endeavor, but well worth it.

We're gluttons, it's fine.

We’re gluttons, it’s fine.

We figured we spent fifty dollars total on all of the ingredients and was able to get the equivalent of four restaurant meals out of it. Of course, because we’re sushi gluttons, we only got two meals :).  When comparing it to the restaurant we usually visit: we get three rolls, soup and salad for $12 a person (that’s the lunch special); but when making it ourselves we estimated it to be around $5 a person. Not bad if I do say so myself :).

A Sweet Dedication to a Sweet Woman

Hello all.

I want to apologize for my absence over the past several weeks. My beautiful grandmother had been admitted to hospice two weeks ago and passed away peacefully last week; so I’ve been mentally and emotionally out of sorts the past few days. Hell, I’ll be honest. I’m devastated.

The one thing I will always remember about my grandma is that she had a serious sweet tooth. (At least I know where I got it from). She was known to turn down dinner because she either wasn’t hungry or didn’t want to put on extra pounds; but the minute she found out there was dessert, she always managed to have her plate ready. I want to dedicate this blog post in her memory.

When I moved, I promised myself I was going to learn to bake more. I normally hate baking. The only time you would ever see me playing with dough and flour is around Christmas time, when my sister and I would bake the ten different kinds of cookies that were expected for our holiday table. Included in the cookie fiasco was my grandma’s favorite: cinnamon rugelach – which she simply called the little twists. I never liked them but she would suck them down like someone was trying to take them from her. Needless to say, I still plain on making them this year….among other things.

She also loved cheesecake.

My mom is usually the cheesecake baker in our house. The thought of it has always made me nervous, so therefore I left that dessert in her hands. However, now that I’m on my own, I gathered enough strength to try it. In the latest issue of FoodNetwork magazine, I found a recipe for a white chocolate cranberry cheesecake. Everything about it sounded right. So I thought “why the Hell not? I’m gonna go for it.” Though you can always go the easy route and buy pre-crushed grahams for the crust and already made cranberry compote, I decided to make things from scratch so it would keep me and my mind busy longer.

I would tell you step-by-step how I did it, but I figured just posting the recipe I used would be much easier 🙂 I will say, though, that my dumb a$$ forgot to buy and orange for the juice and zest needed in the compote…so I just omitted it. It tasted just fine without it, really.

The Compote

The Compote

Of course my cake didn't come out as picture perfect as the magazine....but it was damn good

Of course my cake didn’t come out as picture perfect as the magazine….but it was damn good

Complete with remaining white chocolate chips

Complete with remaining white chocolate chips

I was definitely pleased with the outcome, considering this was my first cheesecake attempt. I’m sure my mother would be proud…too bad the cake won’t last long enough for her to try any. 😛

Anyway, this one’s for you, Grandma. I hope you’re proud. I love and miss you always. xoxoxoxo

R.I.P.

December 28, 1923 – November 5, 2013